How to test my Google Analytics tag?
To test the operation of your Google Analytics tag, please follow the procedure below:
Step 1: Deactivating ad blockers
Disable any ad blocker that may be installed on your browser (like "AdBlock" or others) for your store's domain. If you don't do this, the test may not work and you won't know if the tag is triggering properly.
Step 2: Consent Configuration
a/ Configure consent management
Configure consent management properly. To do this, please follow this FAQ.
b/ Accept cookies
Regardless of your cookie consent banner module, it is important to perform the following test by accepting all cookies on your cookie consent banner. Indeed, we will test the technical implementation of your tag, so if the test works when all cookies are authorized, it means that everything is technically in place for tracking information to be sent to Google. Later, you can test different types of consent. If you then notice a stop or an abnormal decrease in data collection in your Google Analytics account, then the problem will come from your cookie banner module (see this FAQ).
Step 3: Testing Google Analytics Tag Operation
a/ With Tag Assistant Tool
Go to tagassistant.google.com
Click on "Add domain":
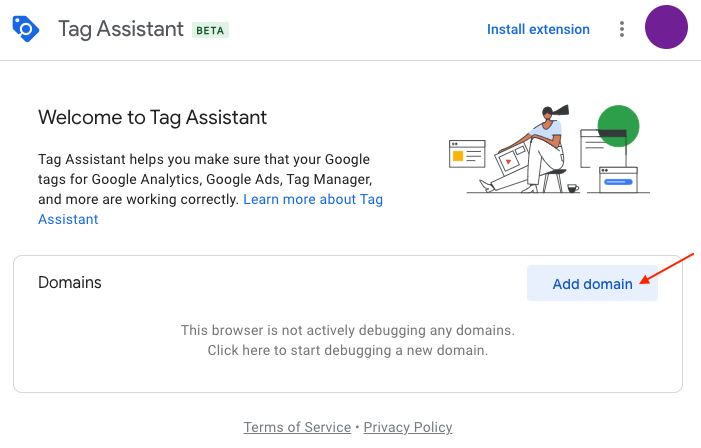
Enter your site's URL and click "Connect":

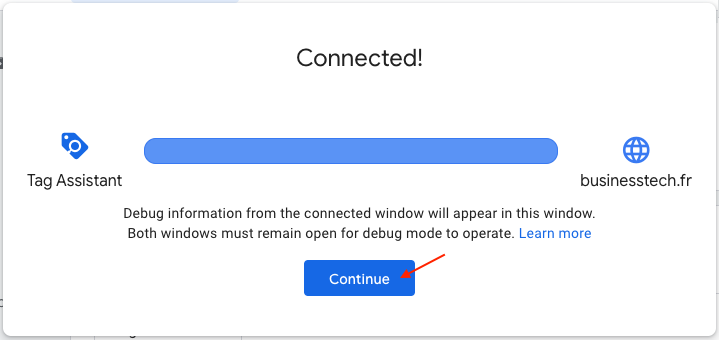
The Tag Assistant will open your site's homepage in a new tab. This is the tab where you'll need to perform the tests.
In the Tag Assistant window, click the "Continue" button:
The Tag Assistant should normally have detected your Google Analytics tag and you should see a window like this:
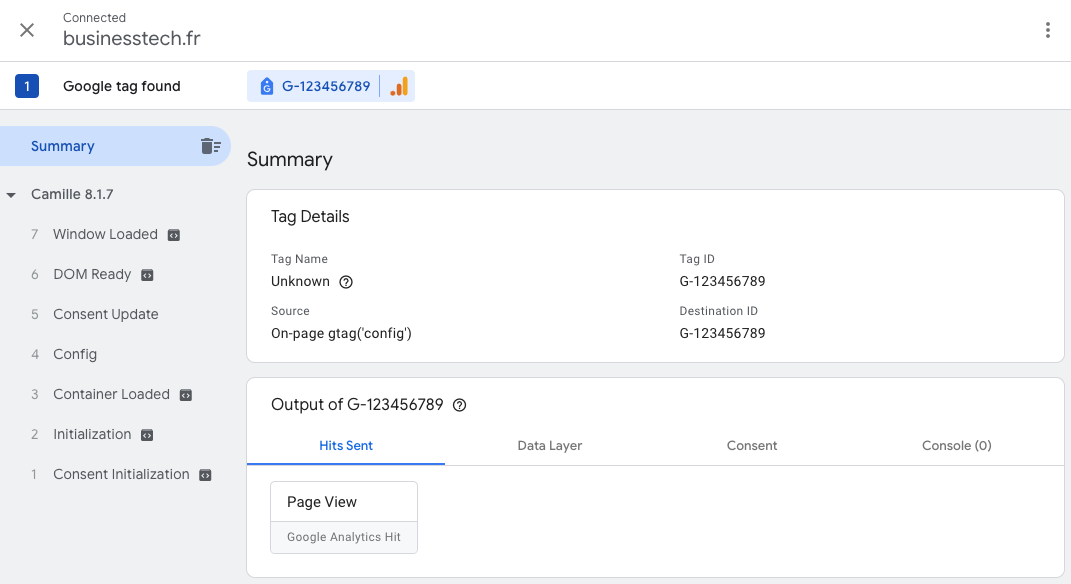
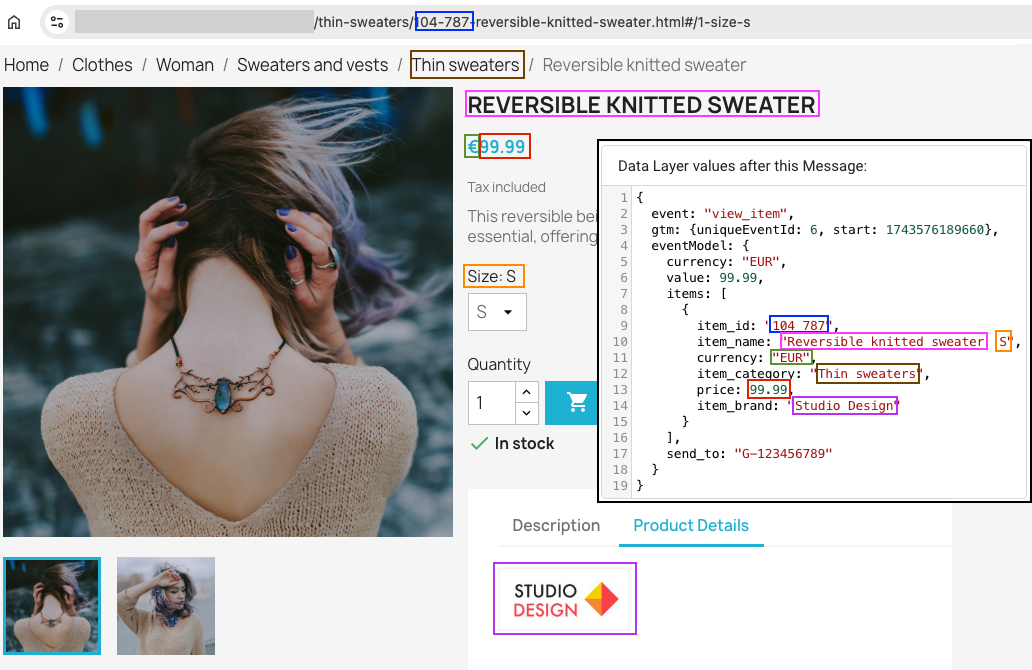
To know if your Google Analytics tag is properly sending information about your visitors' activity to Google, you need to test its triggering on your site's pages. We'll take the example of a product page. You don't need to test your tag on all pages of your site: if your tag works for one, it will work for all.
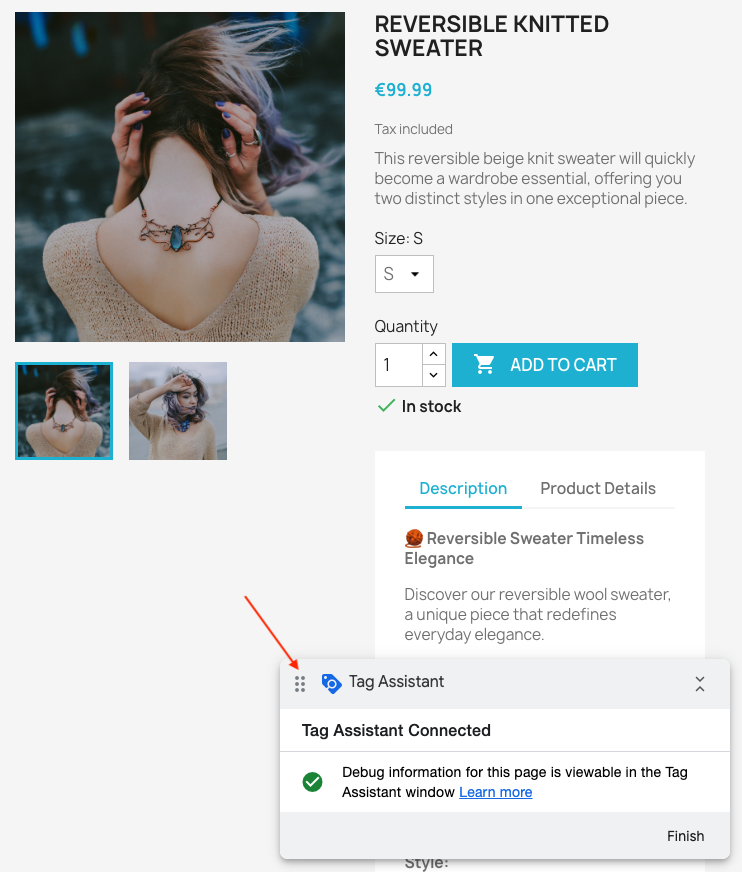
In your site's tab, opened by Tag Assistant, after accepting cookies on your consent banner, go to a product page. A small window in the bottom right indicates that Tag Assistant is connected on this product page:
Switch back to the tag assistant tab.
In the left menu, locate the section corresponding to this product page load. For example here, the displayed product page is for the "Reversible knitted sweater". In the left column of the tag assistant, at the very top we see the section corresponding to the "Reversible knitted sweater":

In this section click on "view_item":

Then on "Data Layer":
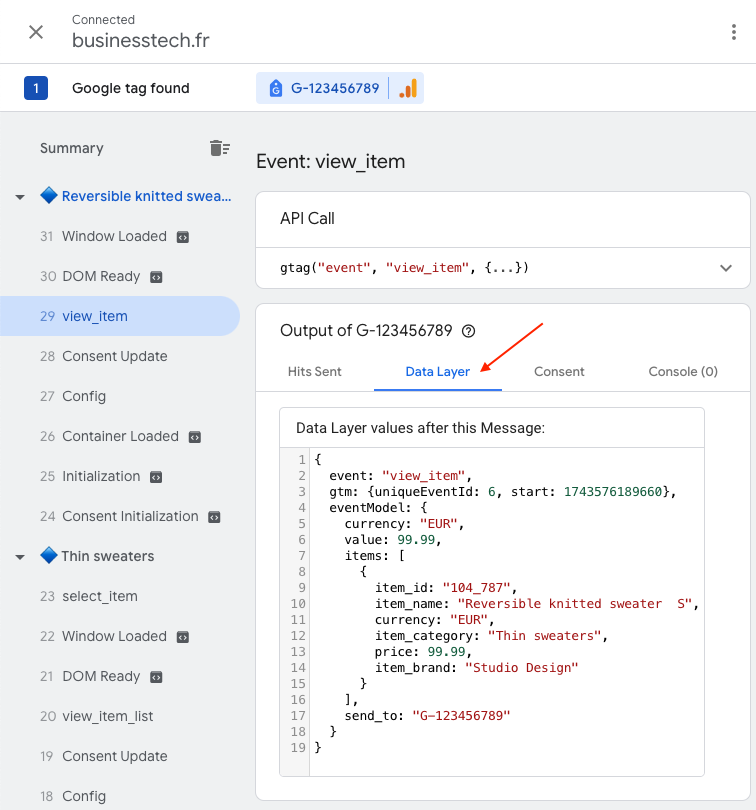
Verify that the product data matches the displayed product:
- If you can see the product information in the data layer, it means your Google Analytics tag is working correctly and technically everything is in place for tracking your store's activity in your Google Analytics account. If later you don't see any data in your Google Analytics account, or you notice a significant loss of data, please refer to this FAQ.
- If you don't see any data appear, it means the Google Analytics tag execution has been blocked. Please refer to this FAQ to know the possible causes and resolve them. Once the problem(s) are resolved, restart the test following the previous procedure.
Click on "Consent". You should find the consents granted for different Google signals:
- ad_storage: reading and writing cookies by Google advertising tags
- analytics_storage: reading and writing cookies by Google analytics tags
- ad_user_data: use of user data in Google advertising products
- ad_personalization: display of personalized ads (remarketing)
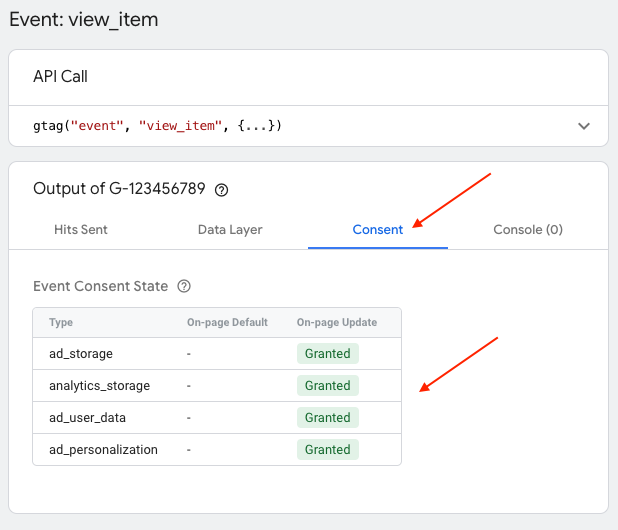
Here, we authorized all cookies (and all signals), so they are all in the "granted" state. Test different consent levels on your CMP (cookie banner) and verify here that the permissions are properly updated. To have perfect granularity in consents and total GDPR compliance, we recommend using the "Advanced Cookie Banner" module as a cookie banner (a subscription version is also available).
For any information about configuring the module with your CMP (cookie banner), click here.
To learn more about verifying Consent mode, click here.
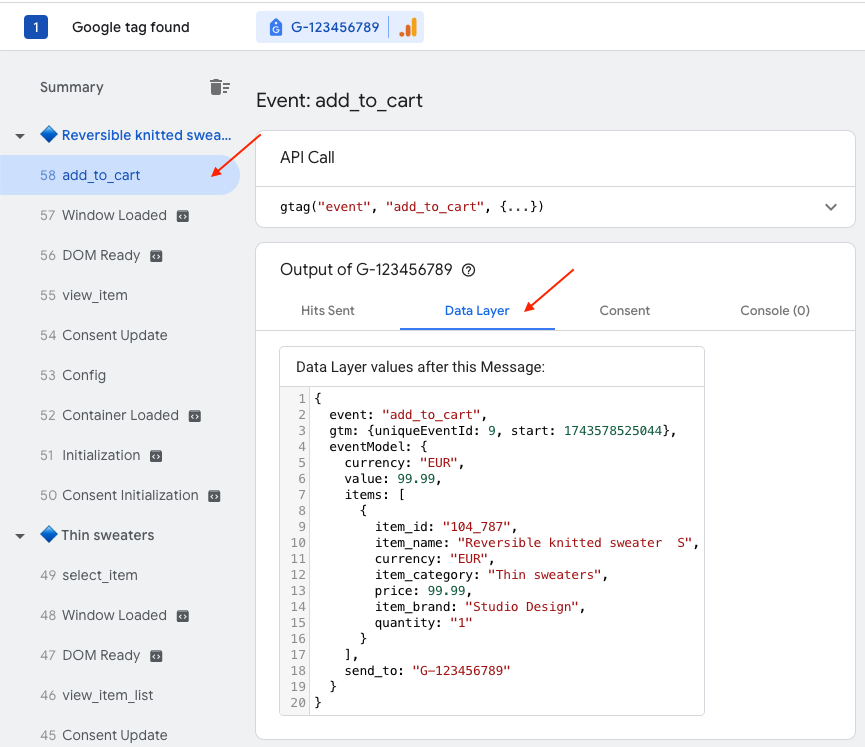
Add the product to cart and verify that the "add_to_cart" event has appeared at the top of the section. Similarly, you can verify the data sent to Google Analytics in the "Data Layer" tab:
Do the same for other events. If you want to test specifically the "purchase" event (order) you can follow this FAQ.
Note: If only certain click events like adding to wishlist ("add_to_wishlist") or adding payment information ("add_payment_info") don't appear in Tag Assistant, it might be because your theme doesn't use default HTML elements. In this case please follow this FAQ to know how to proceed.
b/ Using Google Analytics "real-time" mode
To verify the proper functioning of the tag on your site, you can observe in real-time the events being sent to your Google Analytics account. To do this:
First make sure that you have properly entered the measurement ID of your GA4 tag in the module by following this FAQ.
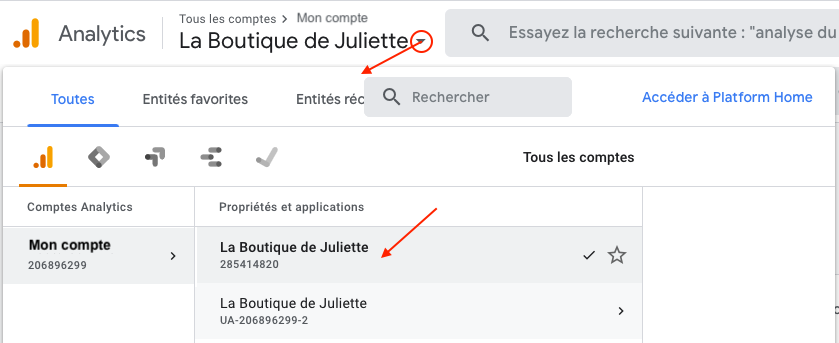
Then connect to your Google Analytics account and verify that the selected account is the one where you created the GA4 property linked to your site and select your GA4 property:
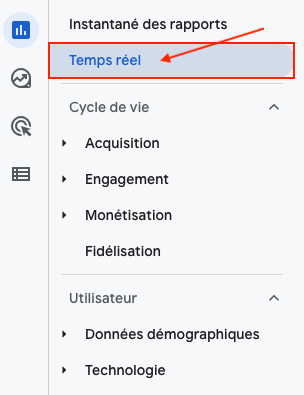
Go to the "Real-time" tab:
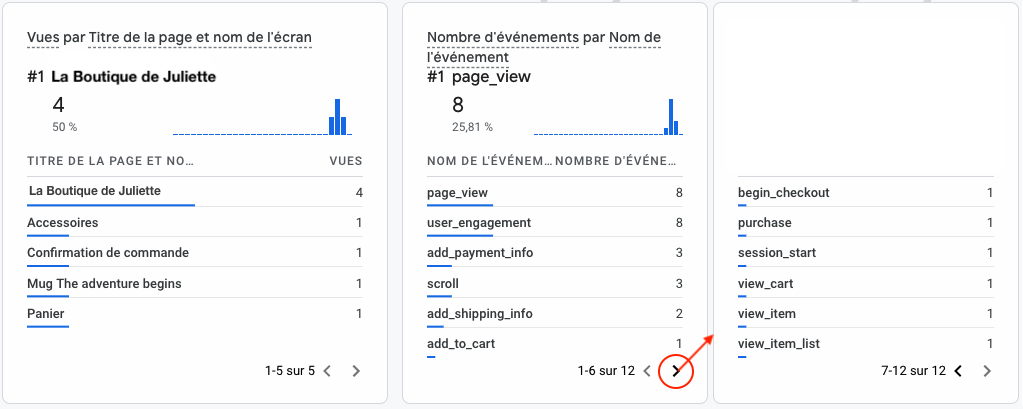
The "Real-time" reports allow you to monitor actions performed on your site as they happen.
For example:
- Number of users in the last 30 minutes: shows the number of users per minute
- Users by source, medium or campaign: shows where your users are coming from
- Users (existing or new) by audience: shows your users' profile
- Views by page title and screen name: helps know which content is generating engagement
- Number of events by event name: shows which events are being triggered
- Conversions by event name: shows completed conversions
If your store already generates traffic, you should already see data in these reports.
Browse your store in a new tab and place a test order: if the tag is working correctly you should see events triggering in real-time as you progress through the conversion funnel. Particularly observe the "Views by page title and screen name" and "Number of events by event name" reports: each time you view a page, you should see that page's name appear a few seconds later in the "Views by page title and screen name" report. At each step of your test order, you should see the corresponding events ("add_to_cart", "view_cart", "begin_checkout", "add_shipping_info" etc... up to "purchase") appear in the "Number of events by event name" report:
- If you can see the product information it means your Google Analytics tag is working correctly and technically everything is in place for tracking your store's activity in your Google Analytics account. If later you don't see any data in your Google Analytics account, or you notice a significant loss of data, please refer to this FAQ.
- If you don't see any data appear, it means the Google Analytics tag execution has been blocked. Please refer to this FAQ to know the possible causes and resolve them. Once the problem(s) are resolved, restart the test following the previous procedure.
Note:
If only certain click events like adding to wishlist ("add_to_wishlist") or adding payment information ("add_payment_info") don't appear, it might be because your theme doesn't use default HTML elements. In this case please follow this FAQ to know how to proceed.