How to configure the module?
![]()
Module - Google Analytics: Google Analytics 4 (GA4) tag
The "Google Analytics: Google Analytics 4 (GA4) tag" module installs the Google Analytics 4 tag on your PrestaShop store and allows you to benefit from innovative reports in order to deeply understand your users and to set up an efficient marketing strategy.
At each step of the configuration, feel free to click on the links to access our detailed step-by-step documentation.
Configuration
After installation, enter the configuration of your new module "Google Analytics: Google Analytics 4 (GA4) tag".
1. Enable Google Analytics 4 tracking
Before enabling your Google Analytics 4 (GA4) tag tracking and starting to collect data, you must create your Google Analytics 4 property in your Google Analytics account. To do this, follow our documentation about GA4 property creation.
Once your GA4 property has been created, go to the "Google Analytics 4 tracking" tab of the module, enable the GA4 tracking and enter your GA4 measurement ID:
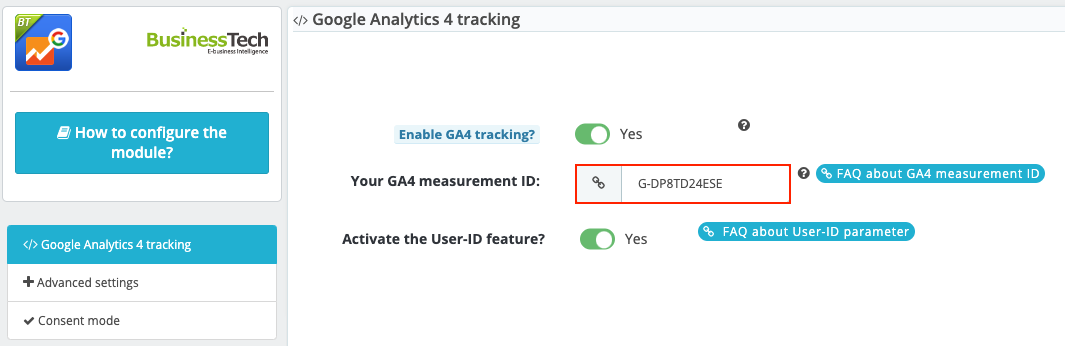
If you want to be able to analyze the same user's journey across different sessions, platforms or devices, you can activate the User-ID feature. To find out more about User-ID, click here.
Save the tab.
And that's it! Your tag starts collecting your first data. You can test its functioning by reading our documentation on the subject.
2. Advanced Settings
Go to the "Advanced Settings" tab to configure your tag more precisely:
2.a. Category wording
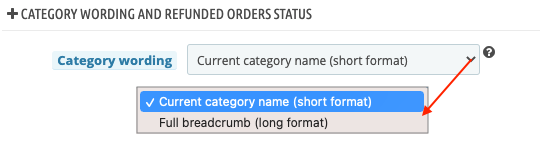
The module lets you choose how the category names will be displayed in your Google Analytics reports. You can choose to show only the current category name (short format), or the full breadcrumb (long format). The long format can be very useful to differentiate between several sub-categories that have the same name.
2.b. Status of refunded / partially refunded orders
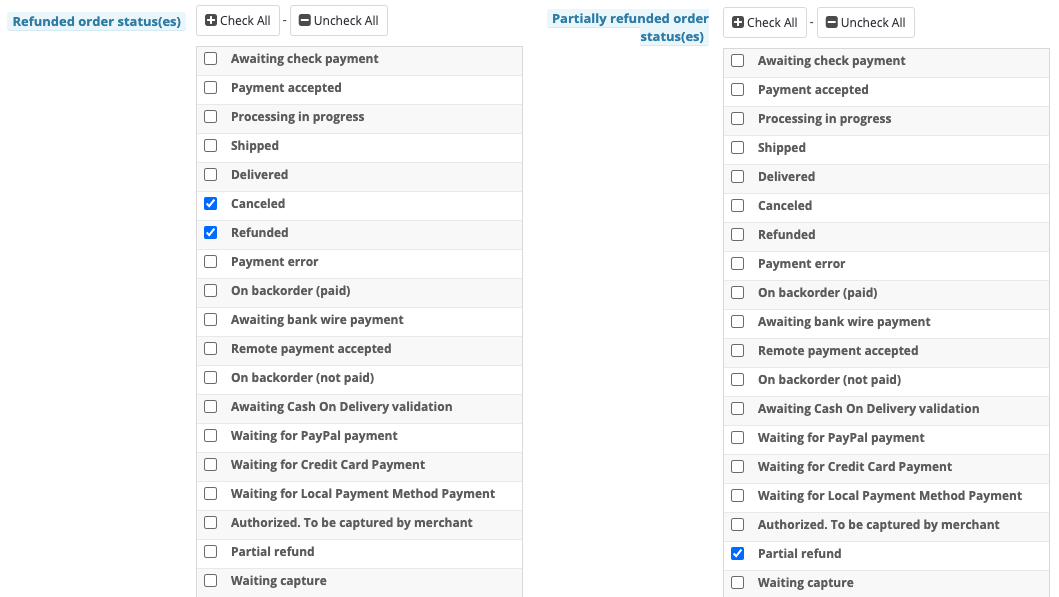
Finally, in order for Google Analytics to accurately take into account orders that have been refunded or partially refunded, the module gives you the possibility to select the corresponding statuses:
2.c. Conversion management
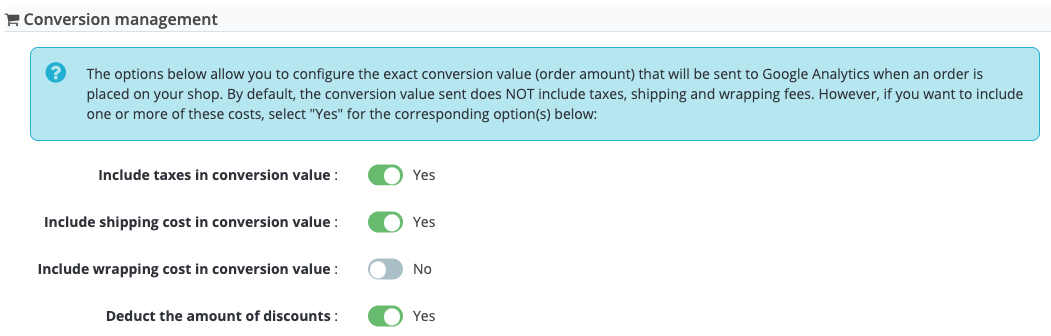
By default, the conversion value (i.e. the order amount) sent does NOT include taxes, shipping and handling. However, if you want to include one or more of these costs, select "Yes" for the corresponding option(s) in the "Conversion Management" section.
For example, in the configuration below, the conversion values (order amounts) sent to Google Analytics will include taxes and shipping costs but not wrapping costs. The amount of discounts will also be deducted:
The module also lets you choose how to identify your orders (using order IDs or references) and which ID you want them to be sent to Google Analytics. If an order has an ID lower than this value, it will not be sent to Google Analytics:

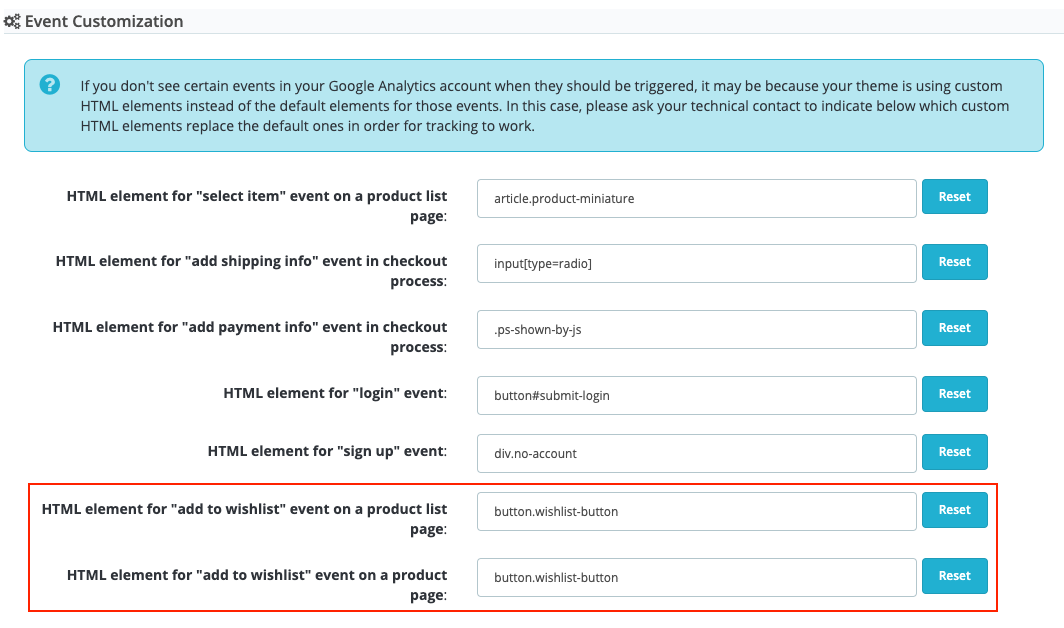
2.d. Event customization
Our module is pre-configured for most themes and can also be adapted to special cases!
If you don't see certain events appear in your Google Analytics account when they should be triggered, it may be because your theme is using custom HTML elements instead of the default elements for these events. In this case, go to the "Advanced Settings" tab and ask your technical contact to indicate, instead of the default HTML elements corresponding to these events, the custom HTML elements used by your theme.
For example, if instead of using the HTML element "button.wishlist-button-add", your theme uses the custom element "button.wishlist-button", replace "button.wishlist-button-add" by "button.wishlist-button" in the remove from cart event field:
3. Consent mode
Our module allows you to enable Google Analytics consent mode to adjust the behavior of the Google Analytics tag based on the consent status of your users. If it is enabled, then as long as users' consent to install cookies has not been received, the tag will only send non-personally identifiable information.
The consent mode of the module is compatible with any cookie management module.
If you want to have different levels of consent (consent only to statistical cookies or only to marketing cookies), we recommend that you use the "Advanced Cookie Banner" module of Presta-Module.
Note: if you have the "Advanced Cookie Banner" module or Axeptio's module, you won't need to configure any consent levels (consent levels automatically detected by our module).
Please read our documentation to learn how to configure consent mode based on your cookie management module.