How to test my Pixel code?
This FAQ will allow you to test your Facebook pixel working. If you don't know how to install the pixel on your shop, click here to visit our FAQ on this subject.
Please follow all the steps in right order.
Once you have checked that your pixel works propoerly, you will be able to use the registered data to create perfectly targeted audiences for your adds and set up dynamic remarketing (re-targeting of your visitors according to what they've seen on your site). For more information on pixel use, click here.
To reach the Facebook official documentation about Facebook pixel test, click here.
Step 1: Pixel Helper installation
To test your pixel working, you first have to install the "Facebook Pixel Helper" extension in your Google Chrome browser (if you don't have Google Chrome, you can click here to download it). To do that, re-open this FAQ into Chrome if you are not already using it, then click here.
"Pixel Helper" is a tool that will allow you to display the data of the pixel installed on your shop and to check that it works properly.
Once you've installed the extension, you shoud see, on the top of the window, next to the address bar, its icon: ![]()
We are going to take the example of four different types of page: a product page, a category page, the cart summary page and the order confirmation page.
Whatever the page type, the first thing to do is to click on the Pixel Helper icon, as you can see on the image below:
![]()
If the pixel works, you must have an icon showing a white ckeck mark on green circle next to all the events loaded by the pixel (see "PageView", "ViewContent" and "Facebook Pixel" in the image above). If you have a yellow (warning) or red (error) icon go to this FAQ third section to solve the issue.
"PageView" means the event loaded is the view of a page. This event will always be displayed by default and this is this event that will allow you to create specific audience rules.
Product Page
On a product page of your shop, click on the Pixel Helper icon. You must see, among others, the "ViewContent" event.
Click on the black arrow next to "ViewContent" to display the details of the information loaded by the pixel:
![]()
The term "ViewContent" informs you that this is the content of a product that has been detected (ie that this is a product page).
As you can see in the example above, in the "ViewContent" you must have the following information:
- content_type: the type of content, i.e a product
- content_ids: the product identification code
- value: the product value, i.e its price without the currency
- content_name: the name of the content, i.e of the product
- currency: the product price currency
- content_category: the product category
Check that you get this information and that this is correct.
Category Page
On a category page of your shop, click on the Pixel Helper icon. You must see, among others, the "ViewCategory" event.
Click on the black arrow next to "ViewCategory" to display the details of the information loaded by the pixel:
![]()
The term "ViewCategory" informs you that a category page has been detected.
As you can see in the example above, in the "ViewCategory" you must have the following information:
- content_type: the type of content, i.e products
- content_ids: the identification codes of the category products
- content_name: the name of the category
- content_category: the category that is just ahead of the displayed category and the displayed category
Check that you get this information and that this is correct.
Cart summary page
Add some products in the cart and go to the cart summary page. Click on the Pixel Helper icon. You must see, among others, the "AddToCart" event.
Click on the black arrow next to "AddToCart" to display the details of the information loaded by the pixel:
![]()
The term "AddToCart" informs you that you are on the cart summary page.
As you can see in the example above, in the "AddToCart" you must have the following information:
- content_type: the type of content, i.e products
- content_ids: the identification codes of the products in the cart
- value: the cart total value without the currency
- currency: the cart currency
Check that you get this information and that this is correct.
Order confirmation page
Place a test order and once you are in the order confrmation page, click on the pixel helper icon. You must see, among others, the "Purchase" event.
Click on the black arrow next to "Purchase" to display the details of the information loaded by the pixel:
![]()
The term "Purchase" informs you that you are on the order confirmation page.
As you can see in the example above, in the "Purchase" you must have the following information:
- content_type: the type of content, i.e products
- content_ids: the identification codes of the purchased products
- value: the purchase total value without the currency
- currency: the purchase currency
Check that you get this information and that this is correct.
I get warnings or errors in Pixel Helper: what should I do?
Warning
If you get a warning (yellow sign) as you can see on the following example:
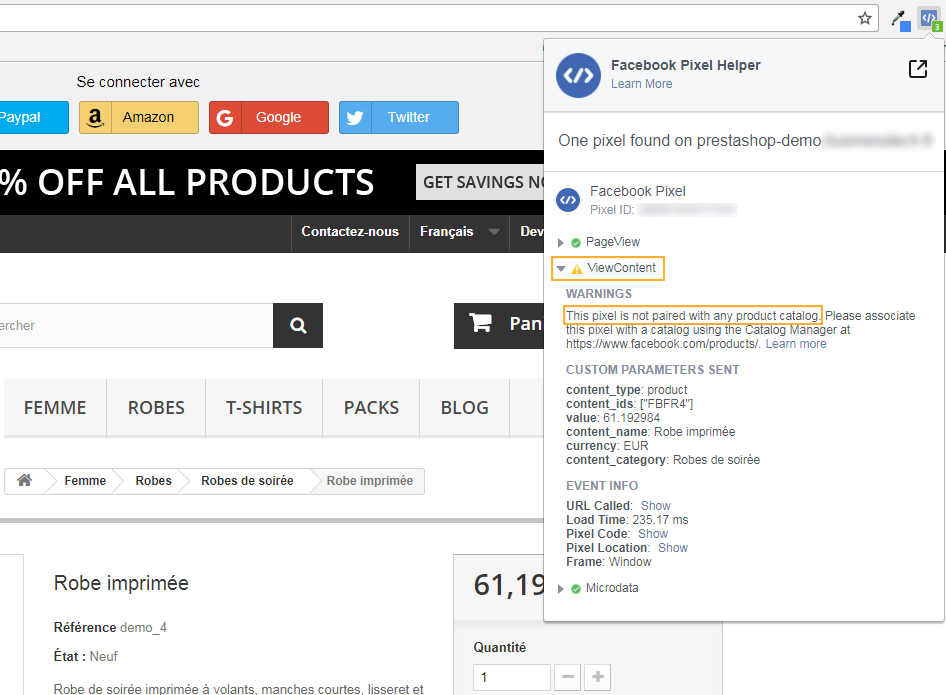
This can mean:
- Either that the product catalog has not been exported to Facebook yet. In this case, export it by following this FAQ: How to import my products on Facebook?
- Or that you have created exclusion rules and the product/category on which you are displaying the Pixel Helper takes part of these excluded products/categories. In this case, return to the module configuration and check your exclusion rules.
In any case, this warning will generate an error in the pixel diagnostic of your Business Manager account. Indeed, Facebook can't track products that it is not aware of, since they have not been exported. You will not be able to track the events related to these products, nor to set up dynamic remarketing. Correct the error and redo the test. Once the products are exported, you should not have this type of warning in the Pixel Helper.
Error
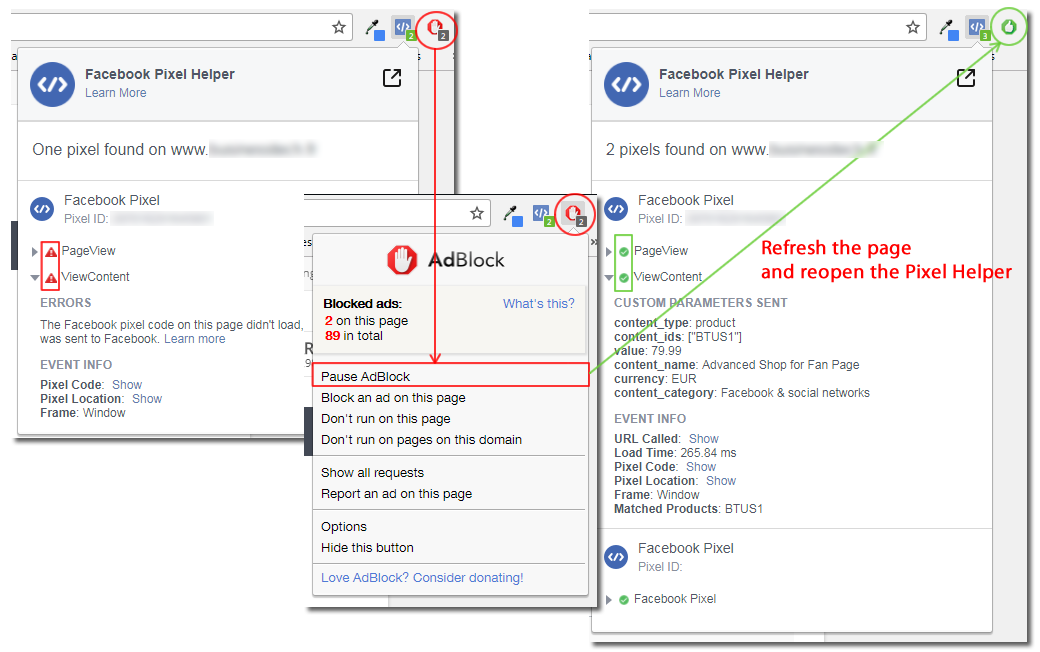
If you get red signal in the Pixel Helper, as you can see on the following example:
It means that the pixel generates errors.
- This can come from the installation of an ad blocker like "AdBlock" on your browser. The pixel can't work with an ad blocker since it precisely allows to advertise. So please note that this doesn't come from our module. Disable "AdBlock", refresh the page and click on the Pixel Helper icon again. If all is green it's that the error actually came from the ad blocker.
Important note: your Pixel Helper may be green whereas the pixel diagnostic in the Business Manager indicates errors. In fact, it's enough that only one of your visitors has AdBlock (or other advertising blocker) installed on his browser when consulting your site, for Facebook to indicate an error. This doesn't mean that the pixel doesn't work. This simply means that some of your visitors don't want to be tracked and have installed ad blockers. Their activity on your site will not be registered (or only partially). That's their right and you can't do anything about it ... From the moment the information given by the pixel helper is all at green on your browser it's that the pixel works properly and you must not take into account the errors or warnings generated in the pixel diagnostic.
- If you don't have an ad blocker or have disabled it and you're still getting errors when you refresh the page, this means that there is a JavaScript error introduced by another module installation on your shop or by your webmaster work on one of your theme templates. To detect this type of error and know how to solve the issue, please read our FAQ on this subject by clicking here.
My Pixel Helper is green but the Business Manager shows me errors: what should I do?
Your Pixel Helper may be green whereas the pixel diagnostic in the Business Manager indicates errors.
In fact, it's enough that only one of your visitors has AdBlock (or other advertising blocker) installed on his browser when consulting your site, for Facebook to indicate an error. This doesn't mean that the pixel doesn't work. This simply means that some of your visitors don't want to be tracked and have installed ad blockers. Their activity on your site will not be registered (or only partially). That's their right and you can't do anything about it ...
From the moment the information given by the pixel helper is all at green on your browser it's that the pixel works properly and you must not take into account the errors or warnings generated in the pixel diagnostic.
My pixel doesn't trigger: what should I do?
If you have a version of the module lower than or equal to 1.2.17:
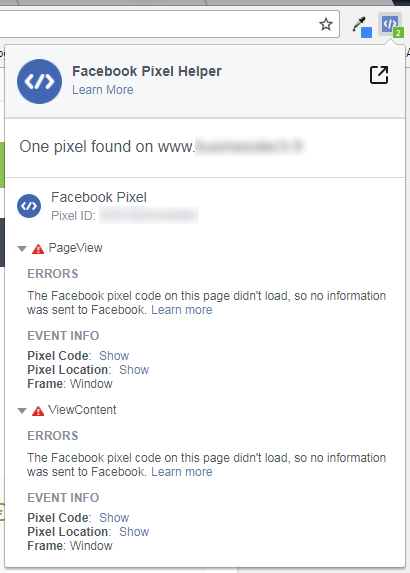
If you note that the pixel helper doesn't trigger, like the example below:
![]()
it's probably due to a change made by your theme in the footer.tpl template in charge of the footer display.
Here is what you have to do, or ask your webmaster to do in order to check this:
Open the footer.tpl template of your theme. IF your theme respects the PrestaShop development standards, you'll find it here:
- themes/your_theme_name/footer.tpl if you are under PrestaShop 1.6
- themes/your_theme_name/templates/_partials/footer.tpl if you are under PrestaShop 1.7
Once the template is opened, look for the character string:
- {$HOOK_FOOTER} if you are under PrestaShop 1.6
- {hook h='displayFooter'} if you are under PrestaShop 1.7
This string allows the call to the PrestaShop footer hook which allows, through a suite of call to functions, the triggering of the pixel. If you don't find this string or if it's placed in comments, then the call to the footer hook isn't done and the pixel can't be triggered.
Then, you must ask your webmaster or theme editor to restore the call to the PrestaShop footer hook.
Whatever the version of the module:
Whatever the version of the module (even if this is extremely rare for versions higher than or equal to 1.2.18) this may come from a JavaScript error that occures before pixel execution. In this case, follow the FAQ on the detection of a JavaScript error and if you notice an error, contact us so that we tell you what to do.
Other FAQs in this category
- Where to find my Business ID?
- How to configure the module ?
- How to create and install my Facebook Pixel?
- How to fill my shop's URL?
- How to automatically update my feeds (on-the-fly output or CRON task)?
- What is the Conversions API and how to enable it in the module?
- Do I have to ask the module to include the attribute IDs into combination URLs?
- How to choose the construction mode of product IDs in the feed?
- How to create custom labels to segment my catalog?
- How to match my products with Facebook categories?
- How to create advanced exclusion rules?
- Do I need to rewrite numeric values into the combination URLs?
- My shop uses multi-currency : how to make Facebook detect the correct currency?
- Do I have to include the LANG ID in the product ID?
- Should I include anchors in my product URLs?
- What is the Facebook "Advanced Matching" feature?
- I manage several languages/countries/currencies: How to use Facebook country feeds?
- How to tag products reserved for adults?